On my road to Serverless and my mission to spend less time on maintenance and more on product development, I finally decided to let go of Jenkins and go for a Serverless version of CI. As I have everything else in AWS, AWS CodeBuild and CodePipeline seemed to be the perfect fit for my purpose.
In this article, I am going to talk about the idea behind Serverless CI, the workings of AWS CodeBuild and get you to build a sample build job using the same. In my next article, I will take you through AWS CodePipeline where we will start building on code checkins on different branches, get people to approve promotions through environments and more.
Prerequisites
I will be using the Serverless framework to do deployments on AWS Lambda, although its not necessary to know both of these, I suggest going through these two articles of mine first:
The Application
I am going to be using this sample public repo and will walk you through on making a build job on top of it. I recommend cloning it right now.
Setting up AWS Codebuild
Now that you have the repo, this one already has a serverless.yml file which we will use to orchestrate our serverless code as discussed in the getting started with serverless framework article.
Create AWS Roles
Step 1: Creating Application Role
Create a role which the deployed application will use, follow the steps mentioned under the heading “Create a role for your Lambda function” in the serverless framework article, skip everything else if you need to.
Step 2: Creating a Role which AWS CodeBuild will use
Create Cloud formation policy
As our CodeBuild will actually deploy using the Serverless framework, we will need to give it permissions to create CloudFormation scripts which is what essentially the serverless framework winds up managing.
Go to My Security Credentials from the top-right menu in AWS Console, go to Policies and click on Create Policy

Select Policy generator which is the easiest option to create the policy here.

Select AWS Cloudformation from the dropdown, Select All Actions from the next, enter * in the resource name to indicate everything and click on Add Statement; proceed to click on Next Step

Next, give a name to the policy such as CloudFormationFullAccess and click on Create Policy
Create AWS CodeBuild Role
Next we will create the Role that AWS Codebuild will assume whenever it runs giving it permissions to call/create AWS resources.
Go to Roles from the left sidebar and click on Create new role
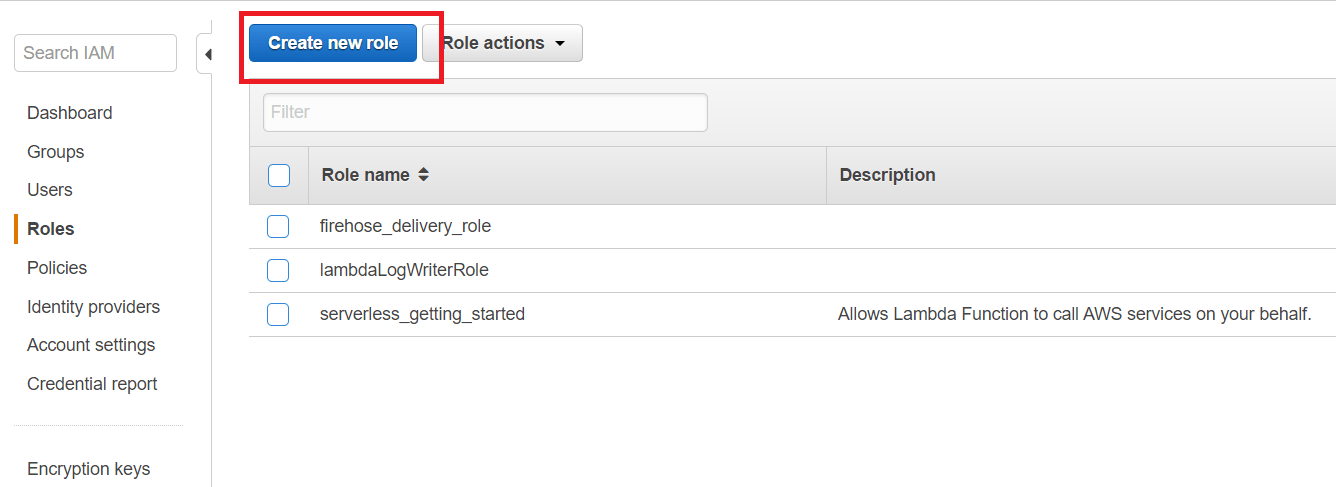
AWS CodeBuild policies are currently not supported from the console directly at the time of writing this article, so we’ll need to do a workaround, simply select whatever service, I chose EC2, we will change this later.

Attach the following policies in this screen:
AmazonS3FullAccess, needed to create buckets where your Lambda code will resideAWSLambdaFullAccess, needed to create/update the AWS Lambda functionCloudFormationFullAccess, this is the policy we created earlier, needed for serverless framework to create CloudFormation scriptsAmazonAPIGatewayAdministrator, needed to create API gateways which will act as a Http front for our AWS Lambda functions.

Give the role a name e.g. codeBuildDeploy and change the description as you deem appropriate; proceed to click on Create Role

Now, we will change the created role to make it applicable for AWS CodeBuild instead of whatever service we had selected before.
Open the Role in AWS Console that you just created, open the Trust relationships tab, click on Edit trust relationship

In the Service section of the JSON document that you see, change the service name from whatever to codebuild.amazonaws.com

Step 3: Know your project
Open the solution in your favorite editor, I use Visual Studio Code.
Open serverless.yml and change the role field to the arn of the role that you created in Step 1, it will look similar to
arn:aws:iam:::role/serverless_getting_started, change us-west-2 to the AWS region of your choice.
The yaml will create:
a. A Lambda function of 128 MB memory, name will have ‘{stage name}echoGenerator’ in it.
b. A dynamo DB table with name ‘{stage name}Users’
c. An API gateway which will be the front for AWS Lambda.
Both of the above qualify for AWS free tier, and we will remove it at the end of the tutorial, in case you want to skip Dynamo DB table creation, you can by commenting out the last section of the file beginning with the heading resources, it is simply for demo purposes.
Step 4: Creating a deployment S3 bucket
We will need to create one bucket where our deployment artifacts, basically anything that the build output generates which will be used in later articles for promotions to higher environments, will be saved.
Go to the S3 management screen in the AWS Console and click on Create bucket
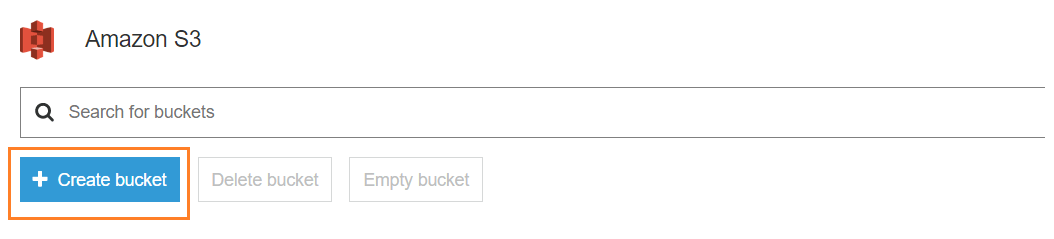
Enter a name like codebuild-deployment-artifacts, choose your favourite region where AWS CodeBuild will be created later and click on Next

Simply click on next, until you reach the Create bucket button and then click on it.
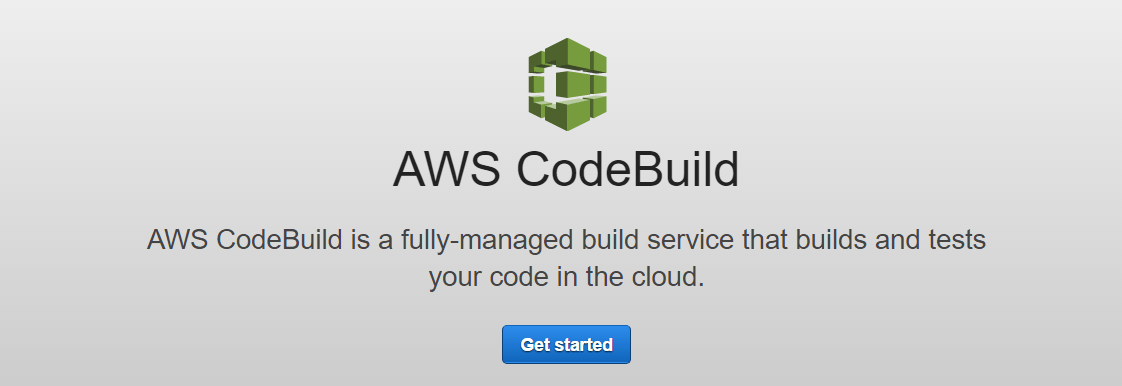
Step 5: Creating AWS CodeBuild project – Selecting source
Go to AWS CodeBuild part of the AWS Console and click on Get started, if you already have another CodeBuild project already in the account, click on Create project button.
In the next screen, put in a name of the build project and select a source for your code, although you can put in the URL of my project directly, however in the serverless.yml file there is a role ARN which is AWS account specific, I recommend forking of my repository, changing the account name to one of yours and continuing.
CodeBuild at the time of writing this article lets you connect with S3 (upload files there), AWS CodeCommit (AWS’s Git) and GitHub (public or private) or any GIT public repository.

Step 6: Setting a build image
This is the major power of CodeBuild, here you can define any docker image which serves as a starting point for your application. In my case, since the sample project is in .NET core 1.1, I have selected the Microsoft maintained aspnetcore-buid public image on docker hub, you can find that image here.
Click on Specify a Docker image, Select Linux environment (only environment supported as of 13 June 2017), select Other custom image type and put in microsoft/aspnetcore-build:1.1 as the image (the value after ‘:’ signifies a tag).
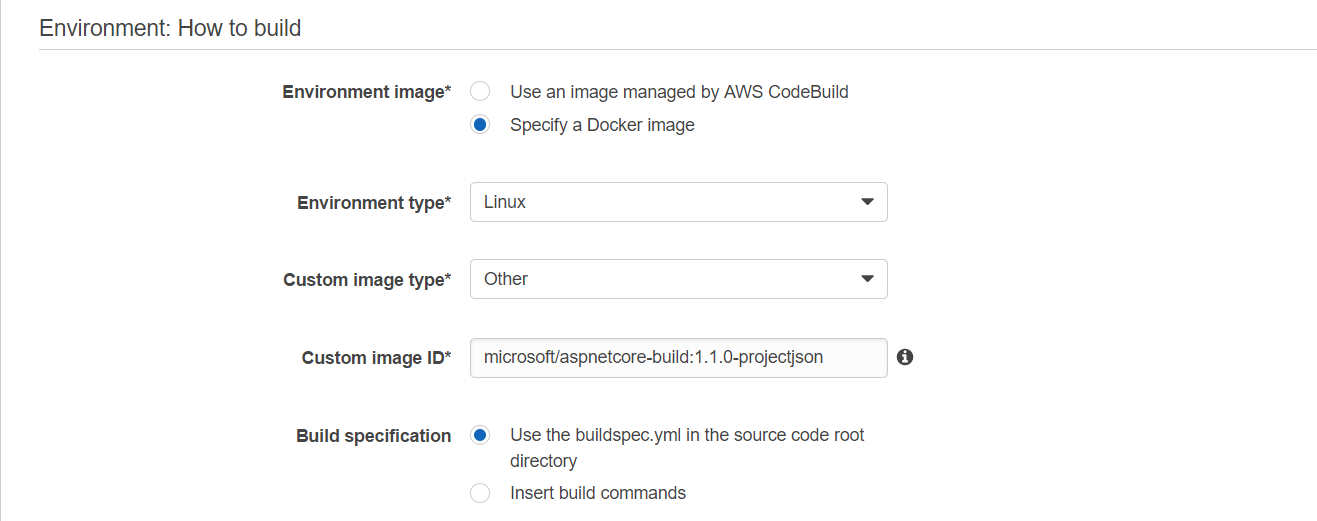
Note: In the screenshot above, the image name is incorrect, I had corrected that later to the one I have written in the steps before it.
Leave the build specification as-is; configured to use buildspec.yml which we will discuss next.
Step 7: Specifying Build commands
AWS accepts two ways to get the build commands, either you specify them while creating the project (in a tiny textbox) or the more recommended buildspec.yml method. I will talk about the YAML method here.
buildspec.yml, by the exact same name is required at the root of your project, the yaml file present in my sample project in Github is given below:
version: 0.1

phases:
install:
commands:
- apt-get -y update
- apt-get -y install zip
- npm install -g serverless@1.9.0
build:
commands:
- dotnet restore
- dotnet publish -c Release -o out
- cd out && zip -r ../publish.zip ./*
post_build:
commands:
- serverless deploy --stage $env --region us-west-2 --verbose

artifacts:
files:
- serverless.yml
- publish.zip
discard-paths: yes
Note the following points:
- There can be various phases of the build, namely
pre_build,buildandpost_build, these can be preceded by aninstallphase where you can install whatever you need e.g. in the sample above, I do an apt-get update and install a zip utility in the same. - Yaml depends on indentation as you might already know, however, Yaml syntax says the
indentationmustbevia spacesandnot tabs; the latter is generally ignored by all popular parsers and code editors like Visual Studio Code put in tab characters; this will however, result in a indecipherable error while running CodeBuild as AWS takes it to heart to only accepts spaces as the method of indentation. - The
artifactssection consists of files that you want to save as output of the build job, this will be required for promotions later which we’ll discuss in the next article (second week July’17). This section is optional. - The
discard-pathsproperty in theartifactssection tells CodeBuild whether to preserve the folder structure for the files to be copied or flatten everything, flattening makes things simpler in promotions, so I chose to do the same. - Every command runs independently and sequentially without context of the previous command, this means that if you do
cd someFolderand in the next line write a command expecting the console to be in ‘someFolder’, this will not be the case, you will always reset to the root of your downloaded source code. If you want to write commands to run in the same context, simply write them in the same line separated by&&e.g.cd someFolder && cat someFileInFolder.yml.
Step 8: Specifying artifact storage
Specify the artifacts, choose Amazon S3 in the artifact type, type in the name which will be used as the folder name while storing your artifacts and choose the deployment S3 bucket that we had created in Step 4

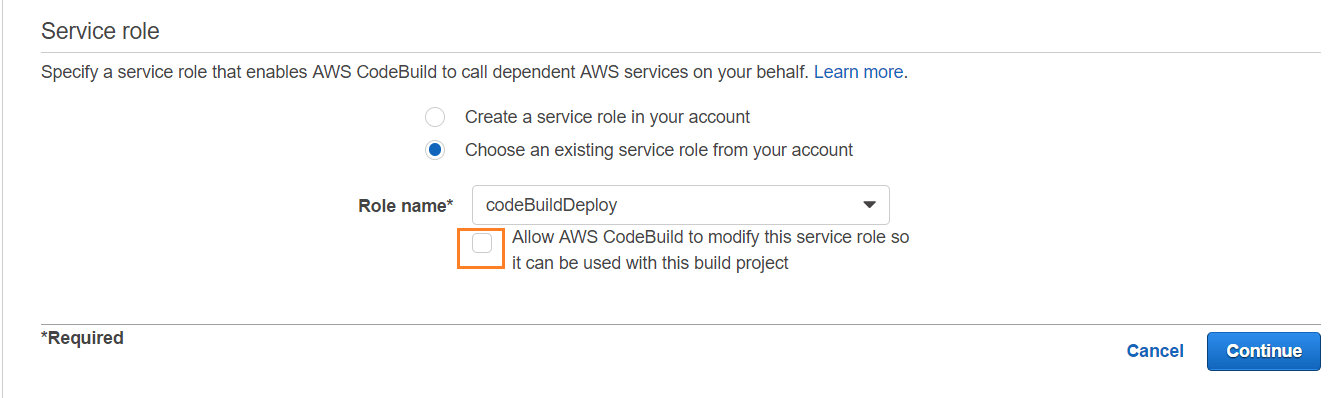
Step 9: Service role and advanced settings
Choose the CodeBuild service role that we created in Step 2 and and make sure you uncheck the checkbox which says it will modify the role, there is no need for that, our role can handle it :-).
If you started with the Get started button, i.e. the AWS account had no previous CodeBuild project, you will not see the advanced section right now, for others scroll down in the same step and just expand that section. Now if you don’t see the advanced section, Save your project, this will come after the review screen, then select the project from the list of Codebuild projects and click on Update as in the screenshot below:

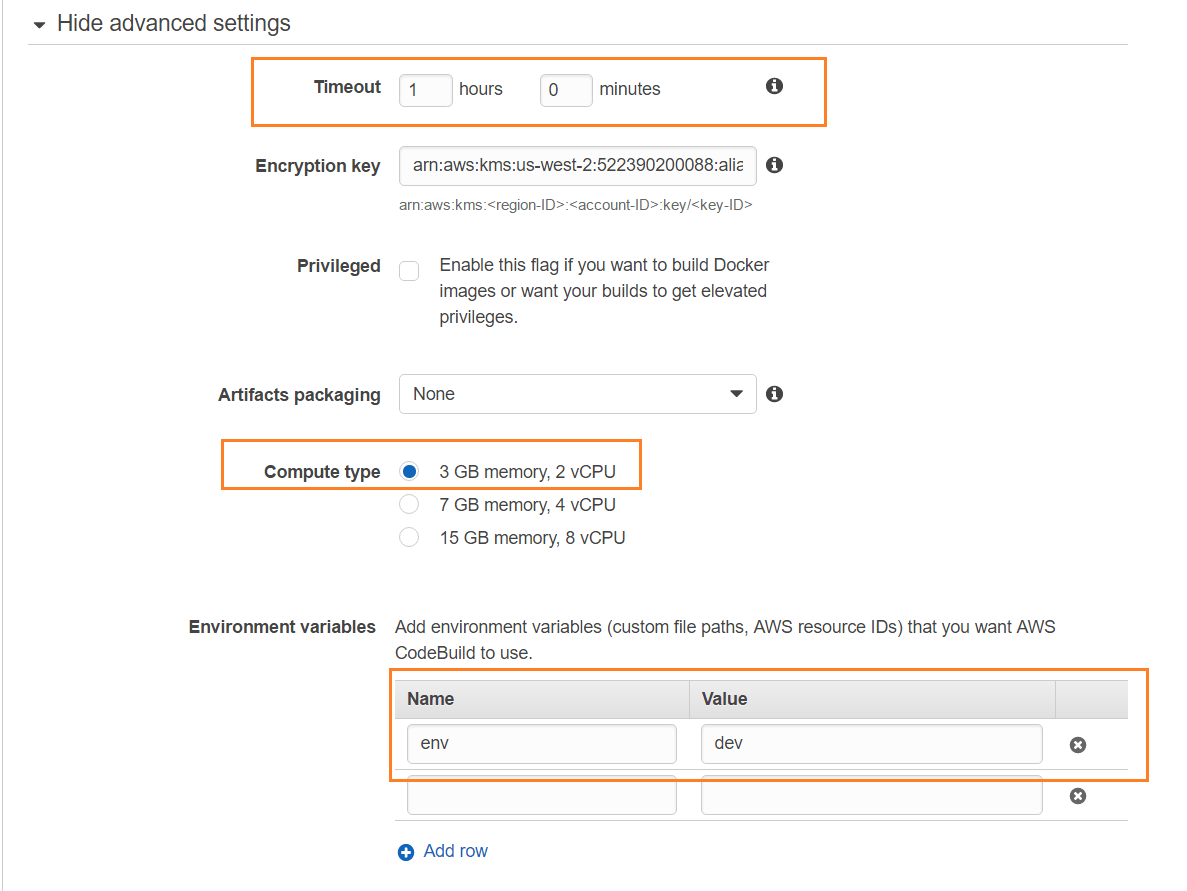
Now, expand your Advanced Settings section and put in an environment variable env with value dev, this is something that we are using in the buildspc.yml file as discussed before.
While we are here, note the following:
- You can change the timeout from a default of 1 hour, CodeBuild charges you for the build time in minutes.
- You can select the compute type, for most serverless applications the lowest one with 3 GB memory and 2 vCPU’s (hyperthreads) is enough.
- You can change artifact settings to put them in raw instead of default compressed in zip format.
- Other things which I don’t use so I’m not gonna comment about :-).
Step 10: Run & Diagnose your builds
Open your build project from the CodeBuild project listing screen and click on Start Build, here you can view previous build histories with their logs as well.
On the next screen, simply click on the build button.

Your first Serverless build job is now on its way, at this time, AWS will provision a server, install your docker container and then run the build steps as defined in the project.
When you run it after a long time (or the first time), provisioning can take upto a minute, otherwise its a few seconds.

As the project goes into the install phase, you can start viewing the live console beneath it to see what’s happening. Note that at this time you can view the build logs from the View entire log hyperlink (goes to CloudWatch) and these logs are stored for 6 months even though the build container will be deallocated as soon as the build finishes.

Step 11: Cleaning up all the resources we created
Before we go, we’ll delete all the resources we created in this post.
In a command console in the folder where serverless.yml is present, type in the following command:
serverless remove --stage dev --region us-west-2
Change the region to the one you were using
This removes everything that the build job created through the serverless framework.
Caution: Upcoming article in the second week of July, I will use whatever we have created here, feel free to run the above command as it will get recreated once you run the build job again, however if you proceed to clean up the below artifacts, you will have to create them again in case you want to learn how to complete your Serverless CI via AWS Codepipeline by following that article.
Proceed to delete the following:
1. The CodeBuild project from the listing screen.
2. The codebuild-deployment-artifacts S3 bucket that we had created.
3. The IAM Policy for CloudformationFullAccess.
4. The codeBuildDeploy IAM role.
5. The serverless application IAM Role
Coming up next: Auto detect changes and promotions
Now that we have successfully setup a job which can build and deploy with the help of the serverless framework, we’ll talk about building a pipeline next where you can:
- Have automatic triggering of build jobs on check ins to a specific branch
- Inject manual approval actions before a task is done in a pipeline
- Create promotion jobs based on the serverless framework
Non-Serverless Deployment Considerations
As my entire focus has been revolving around serverless programming and deployment, I should mention that you can use the more apt AWS CodeDeploy or AWS Beanstalk for deploying non-serverless applications as well and not through AWS CodeBuild.
If you liked this article, you can choose to follow this blog/subscribe to email alerts (floating follow button {bottom-right} or below comments in mobile) so that you know when any future posts come about.
Follow me on twitter to stay updated on filtered AWS news.


We are looking forward to your part 2. Can you please provide some details
LikeLike
My bad.. Went on vacation, it’s actually coming tomorrow
LikeLike
Pingback: Serverless CI: Part 2 – Getting started with AWS CodePipeline | cloudncode
Pingback: Tidbit: API Gateway as a S3 Proxy – CloudFormation script with Serverless Framework | cloudncode
Pingback: Serverless CI/CD Tutorial, Part 3: Deploy – 1Strategy